 Vecto
VECTOFOX FIELD NOTES
PNG to editable SVG paths for Figma
Trace your PNG into filled SVG paths, then import the downloaded file into Figma Design. We tested the two downloadable samples below in a new Figma draft: both exposed editable vector nodes and independent fills, and the ring kept its transparent center after PNG export.
VectoFox documentation · Updated
Distinguish an image fill from vector geometry
Figma imports an SVG containing paths as vector content. Wrapping a PNG in an SVG file does not reconstruct its shapes. Inspect the imported layers and enter vector editing to check what you actually received.
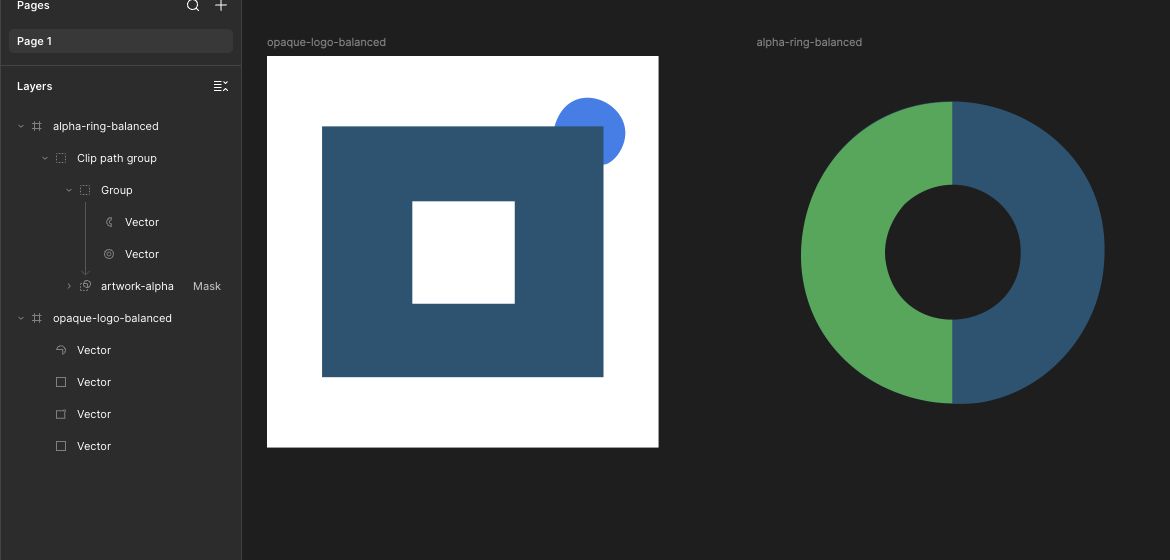
In our test, opaque-logo-balanced.svg became a 256 × 256 frame with four Vector paths. alpha-ring-balanced.svg became a frame containing a Clip path group, a Group with two colored Vector paths, and an artwork-alpha Mask. The mask preserves the transparent silhouette; it is part of this file's geometry, not an image fill.
Trace and inspect before importing
Use PNG to Vector for a transparent source or Logo to Vector for a compact brand mark. Keep the palette as small as the artwork allows. Compare edges, small holes and letter counters with the original before downloading the SVG.
Start with the opaque-logo fixture to inspect ordinary filled paths. The alpha-ring fixture separately tests a multicolor shape with transparent clipping. These are the exact Balanced SVG files imported in the Figma test; their original PNGs are also available below.




Import the downloaded SVG into Figma Design
We used an editable Figma Design draft and Main menu → File → Place image to select the two SVG files, then clicked Place all. This menu imports the SVG geometry even though its name says image. Other import methods were not tested in this check.
Expand the imported frame in Layers. Select a Vector child rather than the whole frame. For the ring, expand Clip path group and Group to reach its two color paths. Keep artwork-alpha Mask in place.
- Download one or both Balanced SVGs above and open a new Figma Design draft.
- Choose Main menu → File → Place image, select the SVG files, then use Place all.
- Move the frames apart if they overlap. Each fixture should measure 256 × 256.
- Expand the Layers tree and select an individual Vector path.
Edit vector nodes and change a single fill
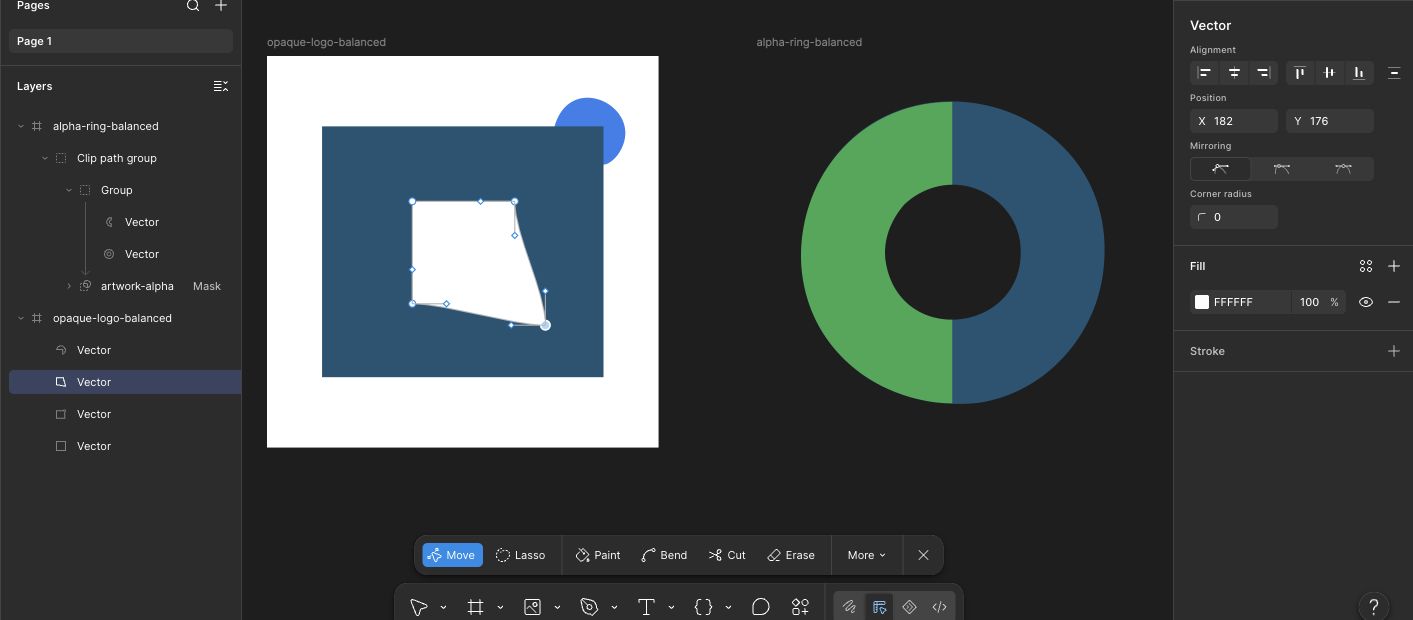
Select a Vector layer and press Enter/Return to enter vector editing. Select a node and drag it, then undo to restore the original outline. Double-clicking a layer name edits its name; use Enter/Return on the selected path to inspect its nodes.
The opaque logo’s inner white square accepted a corner-node move; Figma displayed the moved node at X 182, Y 176. We undid that move. Separately, the accent path’s fill changed from ED602B to 2F80ED without recoloring the blue body or white paths.
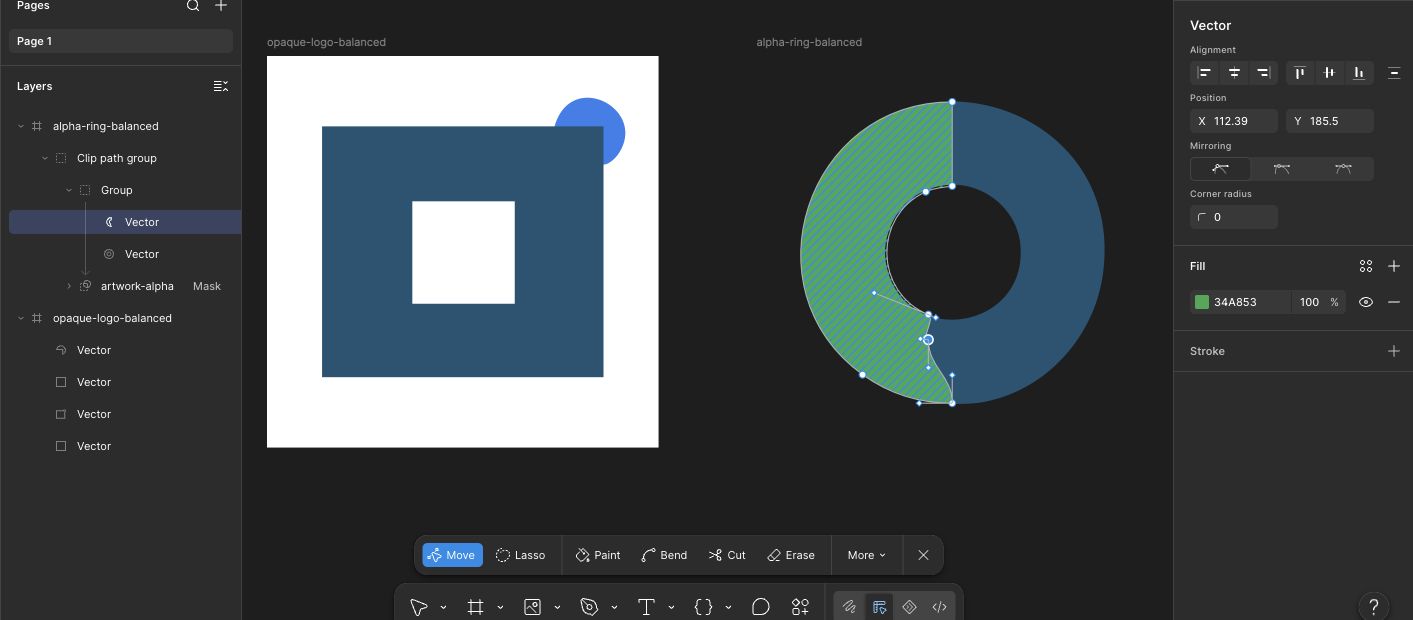
The ring’s left path also accepted a node move and undo, and its fill changed independently from ED602B to 34A853. Changing a fill does not require flattening the group or removing the mask. Close vector editing when finished.
Check transparent holes after Figma export
A dark canvas showing through the ring is a useful visual check, but we also selected the ring’s parent frame, added a 1× PNG export setting and exported it from Figma. The resulting file remained 256 × 256. No white frame fill was enabled.
Pixel checks on that exported PNG found alpha 0 at the center (128, 128) and outer corner (0, 0). The left interior probe (60, 128) was RGBA (52, 168, 83, 255), matching the new green fill; the right probe (200, 128) was RGBA (30, 84, 116, 255), matching the original blue. Coordinates are zero-based.
Keep the artwork-alpha mask when editing the ring. Removing or hiding it can reveal geometry that was meant to be clipped. In contrast, the opaque logo’s white inner square and background are filled paths, not transparent openings.

Know what this Figma test establishes
These two fixtures passed path selection, node movement and individual fill changes in Figma Design on the web on 16 November 2026. The clipped ring also passed the selected transparency probes after PNG export. Screenshots show the actual imported layers and node-editing controls; the downloadable export provides the pixel evidence.
This is a two-file compatibility check, not a test of every SVG, Figma release or desktop app. Complex masks, filters, gradients, large traces and third-party plugins were not covered. If another file imports differently, record the import method and failing shape, and compare the simpler opaque sample with the clipped sample.
Tracing recovers visible outlines, not original drawing instructions. Traced lettering remains path geometry rather than live text. Retype it with a suitable font when you need text editing, and inspect your own artwork before relying on the result.